Basic Questions
1) Keep the debug port ( debug_RX / debug_Tx ) and follow the instructions.
2) If there is no reserved interface, you need to weld solder wire from the module.
Option #1: If the following interfaces are kept as recommended, rather than the solder wire from the module, use the RS232 bridge to connect these UART signals to PC, and use PC tools to upgrade.
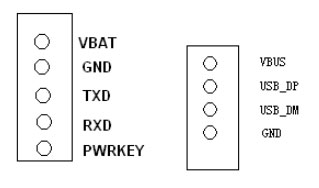
Option #2: SIMCom provides the client with the module upgrade protocol, which, after being built into the application code, can be used to update in the host.
Option #3: SIM900 supports the FOTA interface. Please refer to related documentation.
This could be due to a severe drop in the current. Measure this drop down range with an oscilloscope and set an appropriate upper limit for the VBAT pin.
1) The serial port is not selected properly.
2) The baud rate is set incorrectly.
3) It is recommended to send the AT command in the capital manner, which is the most important.
4) Check the format of the AT command, AT <0d> <0a>.
This is normal. When the SIM card is not detected, SIM_VCC will be controlled to be non-output voltage. Check your hardware or installation.
Pay attention to the internal noise, especially noises from the MCU, memory, SD/TF card, camera, and LCM screen interface.
External antennas are recommended. Avoid noises as much as possible.
As for the type of antenna, a ceramic patch antenna is recommended.
Note the gain indicator if an active antenna is used. Normally, the gain should be around 20dB and the noise index should be less than 1.5.
a) If the UART level of the MCU is 3.3V, the following circuit is recommended. If the level is 3.0V, change the resistance value from 5.6K to 14K.
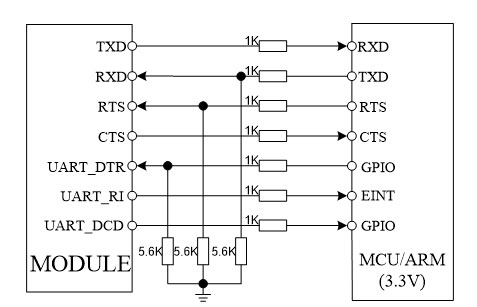
b) If the UART level of the MCU is 3V or 3.3V, the following circuit is recommended.
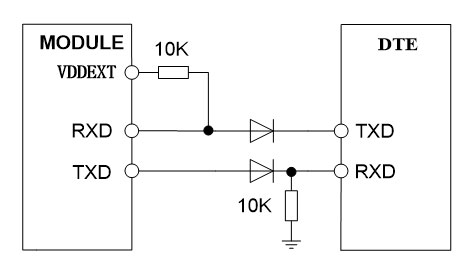
Note: Make sure that the minimum client upper limit is less than 2.8V minus the diode voltage drop.
c) If the UART level of the MCU is 5V, the following circuit is recommended.
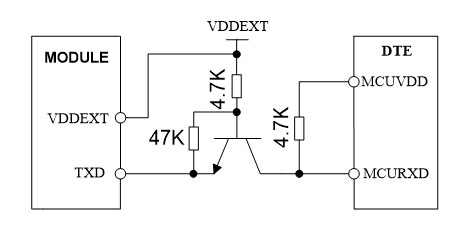
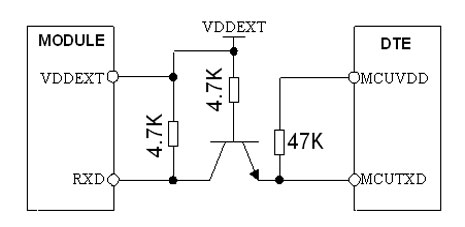
The network light and power light could be a good basis for judgment.
a) If the power light is on and the network light is flashing: the SIM card is not ready, which means that the SIM card will not work after electrostatic discharge. Please check the SIM card and improve the anti-interference ability.
b) If the power light is on, and the network light is on or normally on: The module is blocked, which is due to poor performance of the customer's PCB. If the power supply and GND loops are normal, please check the GND state, and if the surge protection is good, please check …. It is recommended to connect the TVS on the RESET pin of the module to GND.
c) If the power light is off: The module has surely been powered off, which is caused by the customer's power supply. Please improve the anti-interference ability of the power supply.
Making the connection based on the following schematic diagram. ESD9M5.0ST5G or ESD9L5.0ST5G is recommended as the over-voltage protection TVS. Note: Please keep the USB port of the module for further upgrade and debugging.
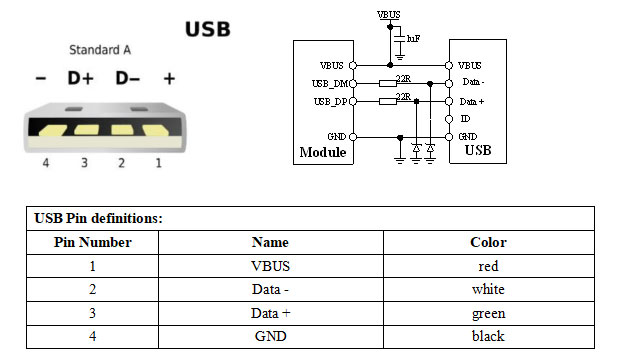
Audio
The module can drive a maximum 8ohm load resistance if there is an embedded AB amplifier inside it. If there is no embedded AB amplifier in the module, it can drive a maximum 32ohm load resistance. An external audio amplifier is needed to drive 8ohm load resistance
1. Check if the MCU has sent an ATH command to end the call.
2. Check whether there are capacitors with high capacitance (i.e. more than 1uF) in the audio interface. In general, only 10pf and 33pf capacitors can be connected to the audio interface to eliminate RF interference. Capacitors with high capacitance will cause instability to the audio PA, which may lead to a call hanging up
Call
AT+CLIP=1 can be used to present the calling line, and you can set AT+QCLIP=1 to present the string type corresponding to the entry saved in the phonebook.
AT+COLP=1 can be used to present the connected line, and you can set AT+QCOLP=1 to present the string type corresponding to the entry saved in the phonebook.
Example: AT+CPBW=1,"02151082965",129,"QUECTEL" //write phonebook entry OK AT+QCLIP=1 // present the string type corresponding to the entry saved in the phonebook OK AT+CLIP=1 //calling line identification enabled OK RING +CLIP: "02151082965",129,"",,"QUECTEL",0 // “QUECTEL” will be presented AT+QCOLP=1 // present the string type corresponding to the entry saved in the phonebook OK AT+COLP=1 //connected line identification enabled OK ATD02151082965; +COLP: "02151082965",129,"",0,"QUECTEL" // “QUECTEL” will be presented
According to the 3GPP standard the maximum time should be 90 seconds. You can set the proper timeout of ATH in the MCU program based on the maximum time.
Flash
The erasable lifetime of flash memory is generally around 100,000. In order to extend this, we have adopted dynamic reading and writing technology in our modules, which allows data to be written to each section of the flash instead of the same block, so each section has the same chance of being used, which avoids damage to the flash chipset.
MMS
Both UTF8 and UCS2 are supported. However, we recommend using UTF8 for better network compatibility.
PHB
AT+CPBS="ON" //choose “ON” phonebook type AT+CPBW=1,"number" //write subscriber number AT+CNUM //query subscriber number
AT+CPBS="SM" //choose “SM” phonebook type, which is to operate the phonebook saved in the SIM card AT+CSCS="GSM" //set the phonebook number and name as GSM format AT+CPBW=1,"number" //write phonebook entry whose index is 1 AT+CPBR=1 //read phonebook entry whose index is 1
Power Supply
This method is not recommended, because the forward voltage of the diode will change as the current changes, which will result in the module’s power supply becoming unstable, causing the module to function abnormally.
The output current of a standard USB interface is max.500mA, which does not meet the peak current demand of GPRS modules. If you need to supply a module with power via USB, you can operate as follows:
1) Use AT+QGPCLASS to set the GPRS level to 8. This command will take effect after the module’s next restart. There is only one uplink slot when the GPRS level is 8.
2) Connect two low-ESR 2200uF capacitors to the VBAT pin and keep them close to the module.
3) Adjusting the VBAT voltage to between 4.2V and 4.5V is recommended, as this can prevent the module from functioning abnormally due to the voltage drop of VBAT.
4) Test the module with a weak signal (e.g. a CSQ value of less than 14). If the module works properly this indicates that the module can be powered via USB interface.
A two stage conversion is recommended: first, step down to 5V via DC-DC converter, then convert to 4V from 5V via LDO as below:

The best way to test power consumption is to supply the module with power separately, in case the peripheral circuit causes extra power consumption. Only VBAT/GND/SIM/RF/PWRKEY should be connected – in this case, the power consumption of VBAT will be the exact consumption of module. To test the power consumption of the EVB board, you should:
(1) Remove the resistors R110 and R102
(2) Solder R224 with a 0Ω resistor
(3) Plug in the power adapter and turn on the 5V power switch See below:
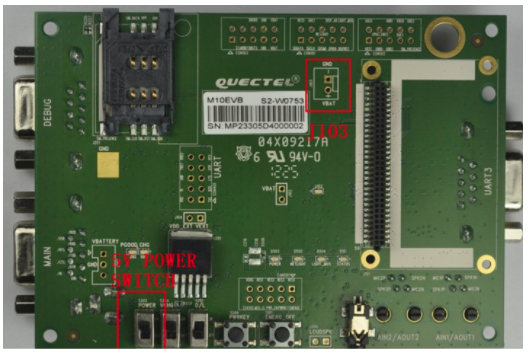
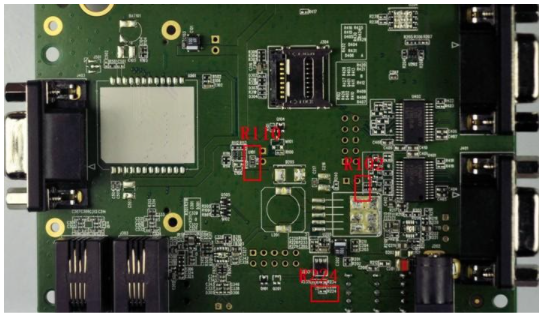
Note:
1. Removing R110 is to ensure the module is being powered directly from the external power via J103.
2. The power adapter should be plugged in to supply power to the RS232 converter and LEDs, which will avoid the increase of power consumption caused by sink current.
3. The VDD_EXT of the module is used to supply power to the RS232 converter. In order to avoid the RS232 converter being supplied by VDD_EXT, R102 should be removed. Meanwhile, R224 should be soldered with a 0R resistor to supply power to the RS232 converter with a 5V power adapter.
PPP
1. Choose “network and sharing centre” in the control panel
2. Choose “set a new connection and network” in “network and sharing centre”
3. Choose “set dial up connection” in “set a new connection and network”
4. Choose “skip” in the following interface
5. Choose “change the adapter configuration”
6. Choose “attribution”, then choose 115200 baud rate in the general option and click “OK”
7. Choose “dial up”, then finish the PPP dial up
1. Is the serial port occupied by other serial communication tools when dialling?
2. Are the baud rate of the module, modem and dial up the same?
3. Is the APN configuration in the modem correct?
4. Is the device design five-wire or three-wire? Does the device open or close the hardware flow control?
5. Is the tested SIM card PIN locked? Is the SIM in arrears?
RF
1. Choose a DC-DC converter with low switching frequency.
2. The input and output line of the DC-DC converter should be far away from the antenna. Note: all power supplies should also be far away from the antenna.
3. The antenna should be far away from the LCD, especially the FPC of the LCD.
4. The antenna and RF trace should be far away from the main CPU, including the SDRAM and flash. It is recommended to add EMI filters at the high-speed line of the CPU, SDRAM and flash.
5. Use the shielding case to cover the CPU, SDRAM, flash and DC-DC converter.
6. The antenna should be far away from the SIM card.
7. Ensure that the enclosure surrounding the antenna and structural components are not made of metal.
8. As the enclosure and components surrounding the embedded antenna will influence the RF performance, it is strongly recommended to provide the device to the antenna vendor to optimize antenna performance. Quectel provides the document for your reference
The TVS inside the module is only to prevent ESD. If the device needs to endure thunderstroke, you can connect a professional anti-lightning TVS to the RF_IN pin outside the module and ensure that the capacitance of the TVS is lower than 0.5pF
1. If the antennas of modules are too close to each other, it will cause EMI interference which will result in diminished signal quality and raise the BER, and cause long-lasting issues with connection or connection failure. We suggest that the distance between each antenna should be more than 20cm.
2. If many modules are working simultaneously, it may prevent some modules from registering with the network due to a lack of base station resources. We recommend using the QuecScan/QuecLock function to lock different modules at different frequencies. For detail you can refer to . You can also use SIM cards from different operators if possible
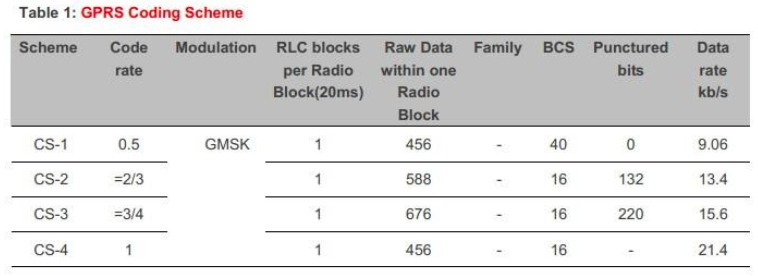
The uplink and downlink time slots will be 4 in GPRS CLASS 12. Using CS4 coding method it is possible to achieve a user speed of maximum 85.6Kbps (for detail please refer to the chart below) Note: The actual speed depends on network status. For example, the actual average speed tested in Shanghai is 30Kbps
Serial
First check the level of the STATUS pin to establish whether the module is currently on – if high the module is on, and if low the module is off. If module is already on, you must consider the following two scenarios:
2.1.1 Abnormal communication between PC and EVB
1) Check whether the serial cable is OK. Quectel’s serial cable is recommended as it can avoid abnormal communication between the PC and EVB when using a three-wire serial cable under the hardware flow control.
2) Check that usage of the serial tool is right. If you use the QCOM tool provided by Quectel, please tick RTS as per the figure below:

2.1.2 Abnormal communication between MCU and module
1) Check that the baud rate of the MCU corresponds with that of the module. Quectel modules are set to autobauding by default. Send 2~4 AT commands to synchronize the baud rate of the module (some modules might need more AT commands to achieve synchronization). Once the module is synchronized, we suggest using an AT+IPR command to fix the baud rate and then AT&W to save it.
2) If using three wires to connect the MCU and the module, you should check if the hardware control is closed.
1) If the UART level of the MCU is 3.3V, the level shift circuit is shown as below
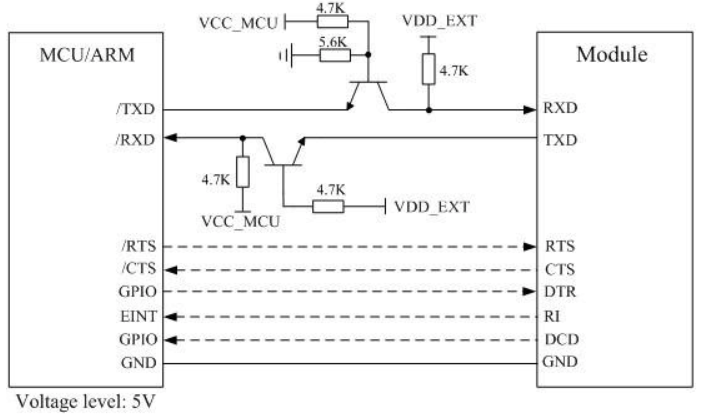
2) If the UART level of the MCU is 3V, change the resistor value of 5.6K to 15K. 3) If the UART level of the MCU is 5V, the level shift circuit is shown as below.
.webp)
SIM Card
1. Ensure that the module’s SIM_PRESENCE pin has been connected.
2. Enable SIM card detection via AT command.
Example: AT+QSIMSTAT=1 // Enable SIM inserted status report AT+QSIMDET=1,1 or AT+QSIMDET=1,0 // Enable SIM card presence detection When SIM card is pulled out or plugged in, module will immediately respond: +CPIN:NOT READY +QSIMSTAT:1,0 or +QSIMSTAT:1,1 Call Ready
If the module responds +CPIN: READY after powering on, but after a while it responds +CPIN: NOT READY, you should consider the following:
1) RF interference
a) Use AT+CFUN=4,1 to disable the RF function and see if the issue persists.
b) Put the antenna close to the SIM card and SIM card signal line, then see if the issue occurs more frequently.
c) Check if there is any electrical/magnetic field around the testing field, e.g. high voltage transmission lines or high-power wireless devices, and try using a shielding case to cover the SIM card and all the SIM signal lines.
d) Try to connect the pins of SIM card signal (SIM_DATA/SIM_CLK/SIM_RST/SIM_VDD) to ground via 15~33PF capacitors to eliminate RF interference
2) Hardware design issue If the VBAT trace is too close to the SIM card signal line, the module can still recognize the SIM card because of the low ripple of VBAT when powering on, but when the module starts to register with the network, the ripple will become higher and interfere with the SIM card signal line, which may stop the module from recognizing the SIM card. You can cut off the module’s power supply and use an external power source to directly feed to VBAT pin of the module and see if this resolves the issue 3) Poor quality SIM card
a) Change to another SIM card and see if this resolves the issue
b) Put the problematic card on the Quectel EVB or cell phone to see if the same issue occurs
1. Use AT+CPIN to check whether module can recognize the SIM card
2. Check whether the SIM card is out of service
3. Use AT+QBAND and AT+CFUN to check the working band and working mode of the module respectively
4. Use AT+CSQ to check whether the RF signal is normal
5. Use AT+GSN to check whether the module’s IMEI number is legal. Changing the IMEI number can cause networks in some areas to treat the changed IMEI number as illegal and prevent the module from registering with the network
SMS Card
There are two modes for SMS, text mode and PDU mode.
1. When using text mode, it is necessary to configure some parameters via AT commands like AT+CMGF, AT+CSCS and AT+CSMP
2. When using PDU mode, you need to include all the parameters like MS center number, receiver number and validity into one PDU string
According to the 3GPP standard, the maximum individual short message size is 1120bits. Under different coding schemes the maximum individual short message size may be different. Please see details below:
1. Using the GSM 7-bit alphabet the maximum size is 160 characters (1120bits/7 bit=160)
2. Using the GSM 8-bit alphabet the maximum size is 140 characters (1120bits/8 bit=140)
3. Using the UCS2 16-bit alphabet the maximum size is 70 characters (1120bits/16 bit=70)
A long message is composed of multiple SMS messages. The long message will be split into multiple short messages and sent out. The receiving terminal is then responsible for reassembling the short messages and presenting them to the user as one long message. Each short message will start with a TP-UDH1 containing segmentation information (TP-UDH1 is set as 1). For Quectel modules, long messages can contain a maximum of 7 short messages
When the SMS memory space is full, incoming messages cannot be received. After executing AT+QEXTUNSOL="SM", 1, the module will respond +TSMSINFO:322 when the SMS memory space is full
The module will respond with an error message when sending some SMS commands if SIM card initialization is not complete, so this must be completed before operating SMS commands. In general, SIM card initialization will be complete about 20 seconds after powering on. However, for some SIM cards, it will take about 40 seconds due to different electrical characteristics. You can use AT+QINISTAT to check the status of SMS initialization. +QINISTAT:3 means the SMS initialization is complete. Note: Before SIM card initialization is complete, executing the following commands will respond error: QMGDA /CGSMS /CSMS/ CMGL / CSAS/CRES/ CMSS /CSCB/ CMGW /CMGD/ CMGR /CPMS
TCP/UDP
99 bytes
31 bytes
1. Non-transparent mode You can get received data by the following two methods:
a) Direct push access mode: Output received data directly from the UART port.
b) Buffer access mode: Read received data from internal buffer using AT commands.
2. Transparent mode You can only get received data directly from the UART port in this mode.
1460 bytes
Each parameter returned by AT+QISACK is defined as 32 bits in the TCP protocol, so the maximum value of the parameters is 2^32 = 4294967296
When module responds “SEND OK”, it only means the data has been sent to the buffer of the TCP socket, rather than to the server. You can use AT+QISACK to check whether the data has been sent to the server
1. The TCP connection is closed by the server
2. If the module still cannot receive ACK from the server after trying 12 times to transmit data to the server, it will automatically close the TCP connection and respond “CLOSED”.
3. If the TCP connection is interrupted the module will respond “CLOSED” due to network abnormality.
When using a module’s embedded stacks like TCP and UDP protocol, you need to use AT+QICSGP to configure the APN. While using PPP, you need to use AT+CGDCONT to configure the APN.
